
Knowing how to locate and use your sewer cleanout is essential for every homeowner. If you are dealing with a clogged drain or suspect a blockage in your sewer line, understanding how to find and access your sewer cleanout can save time, money, and a major mess.
Here’s a quick and helpful guide to get you started:
Quick Guide to Sewer Cleanouts:
- What it is: A capped pipe (3-6 inches in diameter) providing access to your main sewer line
- Common locations:
- Outdoors: 1-3 feet from foundation, often along a straight line to the street
- Indoors: Basements, utility rooms, garages, or near where main drain exits the house
- How to identify: Look for a round cap with a square nut on top, labeled “S” or “C.O.”
- Basic use: Provides access for clearing clogs and inspecting the main line
Your home’s sewer cleanout is the unsung hero of your plumbing system. This simple access point can save you thousands in repair costs and prevent the nightmare of sewage backups. Installed as a standard feature in homes built after the 1940s, the cleanout gives direct access to your main sewer line for maintenance and emergency situations.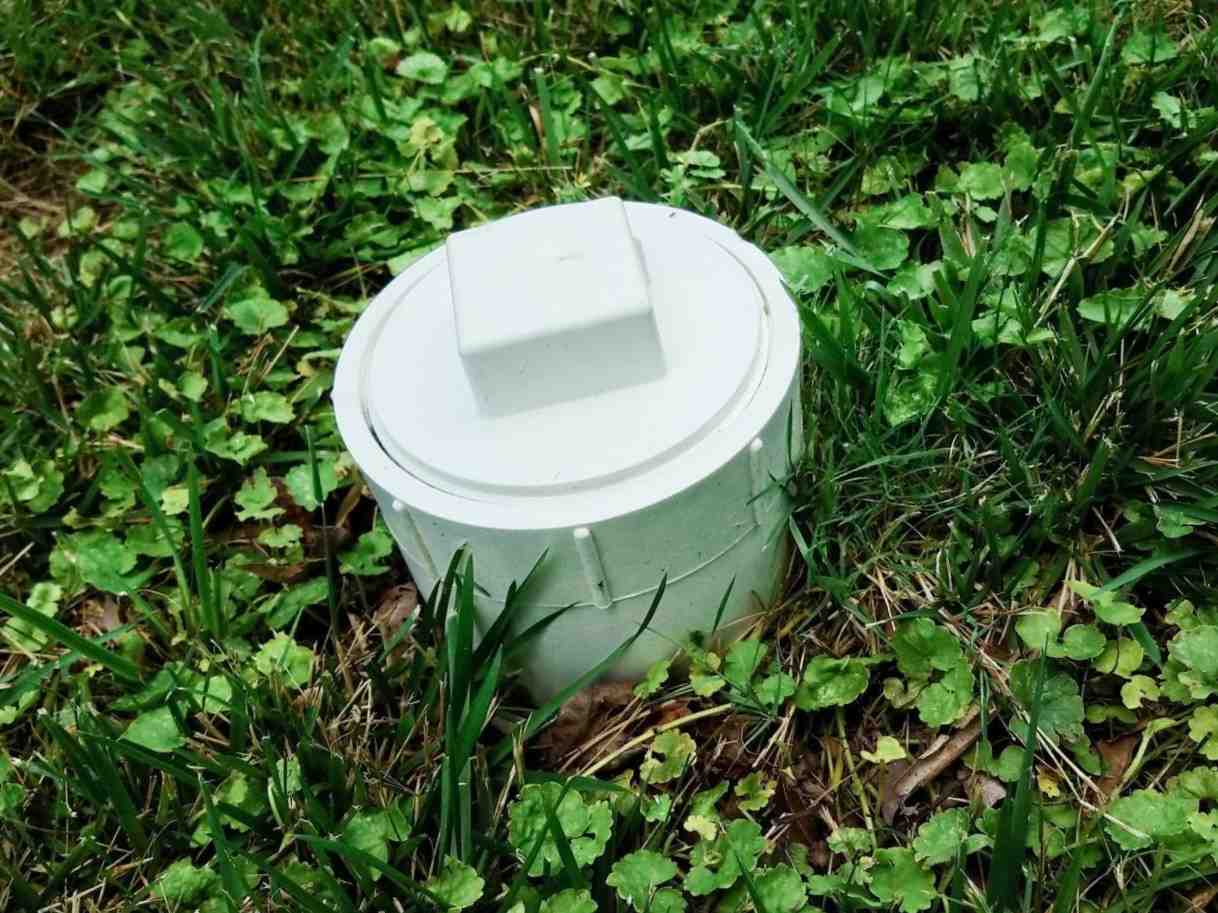
Think of your plumbing system like a tree – your cleanout sits at the base of the trunk where all branches (individual drain lines) eventually connect. This strategic position makes it invaluable when diagnosing or clearing main line blockages.
I’m Jason Best, founder of SewerRepairs.com with over 20 years of experience as a master plumbing technician specializing in all things sewer! I am well versed in maintenance and repair procedures that prevent costly excavations and property damage.
Step-by-Step Guide: How to Locate and Use Your Sewer Cleanout
Ready for a plumbing treasure hunt? Finding your sewer cleanout might sound daunting, but I promise it’s manageable with the right approach. Your home’s age, foundation type, and local climate all influence where this vital access point might be hiding. Before we start our search, let’s gather a few essentials:
- Flashlight
- Screwdriver or soil probe
- Disposable rubber gloves
- Pipe wrench
Safety first! Always wear those protective gloves when working with any part of your sewer system. You never know what you might encounter.
Did you know that roughly 76 million American homes still have cast iron sewage lines with brass or cast iron cleanouts? Meanwhile, newer homes typically feature ABS plastic or PVC materials. This distinction matters because it affects both how you’ll find and maintain your cleanout.
| Location Factor | Indoor Cleanout | Outdoor Cleanout |
|---|---|---|
| Climate | Common in colder regions | Typical in warmer regions |
| Foundation | Often found in homes with basements | Standard in slab foundations |
| Appearance | T- or Y-shaped fitting with threaded cap | Capped pipe protruding from ground |
| Access Point | Near where main drain exits house | 1-3 feet from foundation |
| Identification | Part of visible plumbing | May be marked with “S” or “C.O.” |
Step 1 – Know What You’re Looking For
Your sewer cleanout is typically a 3, 4, or 6-inch diameter pipe with a threaded cap or plug. Look for a square nut or notch on top of the cap – that’s designed specifically for removal with a pipe wrench. Depending on your home’s age, the cleanout might be made of black ABS plastic, white or cream PVC, dark gray cast iron, yellowish brass, or even brownish bronze.
The cap might be stamped with “S” (for sewer), “C.O.” (for cleanout), or simply have that distinctive square nut without any markings. Newer homes sometimes house the cleanout in a protective ground box – fancy, right?
Step 2 – Trace Likely Locations (Basement, Garage, Yard)
Where your cleanout hides depends largely on your home’s construction and local climate. Let me guide you through the most common locations:
If you have a basement, check around the perimeter walls, especially exterior ones. Look for a capped pipe near where your main drain exits the house. Sometimes following the drainage pipes from fixtures like sinks and toilets can lead you right to where they all converge – that’s often where you’ll find your cleanout.
For homes on slab foundations, the search pattern changes a bit. In colder climates, the cleanout is usually indoors – check utility rooms, garages, or near water heaters positioned along exterior walls. If you’re in a warmer region like Southern California, look outside, typically 1-3 feet from your foundation. Try tracing an imaginary straight line from your home toward the street or your septic tank.
For outdoor cleanouts, walk the path from your house toward the municipal sewer connection or septic tank. Look for that telltale capped pipe sticking up from the ground, often along this straight path. Some neighborhoods have an “S” marking on the curb – if you spot one, follow that line back toward your home.
Since the 1990s, the International Plumbing Code has mandated cleanouts for accessibility. But if your home predates these regulations, your cleanout might be in an unusual spot – or you might not have one at all!
Still stumped? Ask your neighbors with similar homes where their cleanout is located. In many developments, especially those built by the same contractor, cleanouts often show up in nearly identical positions.
For more detailed guidance on finding your main sewer line, check out our comprehensive guide on How to Locate House Sewer Line.
Step 3 – How to Locate and Use Your Sewer Cleanout if It’s Buried
Sometimes, especially with outdoor cleanouts, Mother Nature reclaims these access points under soil, mulch, or grass. Here’s how to uncover a hidden cleanout:
Grab a soil probe or long screwdriver and gently poke the suspected area, going about an inch deep at a time until you hit something solid. The plastic cap of a cleanout has a distinctive feel – different from rocks or roots you might encounter.
For older homes likely to have cast iron pipes, a metal detector can be surprisingly effective. (This trick won’t work for plastic pipes, though.)
Clear away vegetation, mulch, or decorative rocks in your search area. Sometimes, you’ll notice subtle clues – a slight depression or elevation in the yard often indicates where a cleanout lies beneath.
If you’re really stuck, county assessor records or original property plans might show the exact location of your sewer line and cleanout. It’s like having the treasure map instead of just the clues!
Before digging more than a few inches, please call your local utility marking service (usually 811). In our years serving Riverside, Corona, and throughout the Inland Empire, we’ve seen too many DIY disasters from hitting unmarked utility lines.
Step 4 – Open the Cleanout Safely & Clear Minor Clogs
Once you’ve found your cleanout, opening it requires some caution:
First, prepare for potential spillage by wearing those rubber gloves and having towels or a bucket handy. Always stand to the side, not directly over the cleanout – trust me on this one!
A pipe wrench is your best friend for removing the cap. Turn counterclockwise to loosen, but pay attention to how it feels. If you sense resistance or pressure when loosening the cap, stop immediately and tighten it back up. This could indicate a blockage causing pressure buildup, and you don’t want that releasing all at once.
For minor clogs you feel comfortable tackling yourself, a drain auger (snake) works wonders. Feed it slowly into the cleanout, turning the handle as you go to break up the clog. After clearing the blockage, run water through the system to ensure proper flow before replacing the cap. Clean those threads and tighten firmly – but not so tight you’ll need superhuman strength next time!
For more serious clogs or to get a professional assessment of your sewer line’s condition, I highly recommend a Sewer Line Video Inspection. This non-invasive procedure uses a specialized camera to identify blockages, cracks, or other issues without any excavation.
Step 5 – How to Locate and Use Your Sewer Cleanout for Routine Maintenance
An ounce of prevention is worth a pound of cure – especially with sewer systems! Here’s how to maintain your cleanout and main line to prevent costly emergencies:
Schedule regular cleaning every 18-22 months. Professional maintenance prevents buildup and catches potential issues before they become disasters. Keep the area around your cleanout clear of vegetation if it’s outdoors, and ensure indoor cleanouts remain accessible (not buried behind storage boxes).
Consider marking the location of outdoor cleanouts with a small stake and colored flag. You’d be surprised how many homeowners forget exactly where their cleanout is until they desperately need it!
Check the cap periodically for cracks or corrosion, and make sure it can be removed when needed. A little preventive maintenance here goes a long way.
Even without obvious problems, periodic camera inspections can identify developing issues before they turn into emergencies. Think of it as a preventive health checkup for your plumbing system.
Professional sewer line cleaning typically costs between $99 and $900, with most homeowners paying around $288. Camera inspections range from $100 to $800. While these services are an investment, they’re far less expensive than emergency repairs or cleaning up after sewage backups – not to mention the peace of mind they provide!
How to Locate and Use Your Sewer Cleanout might not be the most glamorous homeowner skill, but it’s certainly one of the most valuable. When that unexpected backup happens (usually during a holiday dinner with the in-laws, naturally), you’ll be glad you took the time to find and understand this critical access point.
Warning Signs & When to Call a Pro
Your sewer system works silently in the background—until it doesn’t. Knowing when to tackle a problem yourself and when to call in the cavalry can save you time, money, and a whole lot of mess. I’ve seen homeowners wait far too long before calling us, turning a simple fix into a major headache.
Multiple slow drains across your home are like your plumbing system’s way of waving a red flag. When your shower, toilet, and kitchen sink all start backing up at once, your main line is likely the culprit—not just a localized clog.
Have you noticed gurgling sounds coming from your drains? That’s air trapped in your pipes trying to escape, often because something’s blocking the normal flow. It’s like your plumbing is clearing its throat, trying to tell you something’s wrong.
Nothing ruins breakfast faster than the unmistakable aroma of sewage odors wafting through your home or yard. This isn’t just unpleasant—it’s your sewer line broadcasting that something’s broken or blocked.
When water backs up into lower fixtures like basement drains or first-floor toilets after running the washing machine, your main line is struggling. This is particularly concerning because it often means sewage—not just clean water—is returning to your home.
Take a walk around your yard. See any mysterious wet spots, especially along the path where your sewer line runs? That’s rarely a good sign. Your underground pipe might be cracked or collapsed, allowing wastewater to seep into your lawn.
Perhaps the most immediate warning: if you notice high pressure at the cleanout when loosening the cap, stop immediately and tighten it back up. This pressure indicates a significant blockage, and removing the cap completely could result in a geyser of sewage on your property—I’ve seen it happen more times than I care to remember!
Professional plumbers bring specialized equipment that makes DIY tools look like toys. Our hydro-jetting equipment delivers up to 4,000 PSI of water pressure—enough to slice through tree roots and years of buildup while being gentle on your pipes. Our advanced camera systems don’t just detect problems; they pinpoint their exact location and nature, saving hours of guesswork and unnecessary digging.
Beyond equipment, professionals understand local permitting requirements. Throughout Riverside County and the Inland Empire, our technicians steer complex municipal codes so you don’t have to worry about compliance issues or potential fines.
The bottom line? Minor clogs near fixtures might be DIY territory, but main line issues almost always require professional intervention. Attempting major repairs yourself can sometimes make the problem worse—and significantly more expensive to fix.
If you’re seeing any of these warning signs, don’t wait until sewage is backing up into your bathtub. Learn more about what to do if you have a broken sewer pipe and take action before a small problem becomes a disaster.
Maintenance & Prevention Tips
Keeping your sewer line in tip-top shape isn’t just about avoiding nasty backups—it’s about protecting your home and your wallet. After two decades of crawling through crawlspaces and digging in yards across Riverside County, I’ve seen how a little prevention goes a long way.
What you put down your drains matters more than most homeowners realize. That bacon grease might seem harmless as it slides down your kitchen sink, but it’s silently building up in your pipes like cholesterol in arteries. Instead, let it cool and toss it in the trash. The same goes for so-called “flushable” wipes—trust me, your sewer line disagrees with that label! Stick to the golden rule: only human waste and toilet paper should take the plunge.
Your landscaping choices can be your sewer line’s best friend or worst enemy. Those beautiful weeping willows might create amazing shade, but their thirsty roots are drawn to the moisture in your sewer line like moths to a flame. If you already have trees near your sewer path, consider installing root barriers—they’re much cheaper than digging up your yard for pipe repairs!
Regular maintenance isn’t exciting, but neither is sewage in your basement. Mark your calendar for professional cleaning every 18-22 months—this simple step alone prevents most of the emergency calls we get in Redlands and Moreno Valley. Keep a maintenance log with dates, service details, and any issues found. This documentation is not only helpful for you but becomes a valuable selling point if you ever put your home on the market.
Your cleanout cap deserves some attention too. Check it periodically to ensure it’s not cracked or loose. A properly sealed cap keeps critters out and prevents unexpected geysers during backups. In areas with freezing winters, a bit of insulation around exposed cleanout pipes can prevent costly freeze damage.
Become a drain detective by paying attention to early warning signs. That slow-draining tub isn’t just annoying—it’s your home trying to tell you something. When multiple drains start gurgling or draining slowly, it’s like your sewer line is sending up a distress flare. Don’t ignore these signals!
Throughout San Bernardino County, I’ve seen $10,000+ emergency repairs that could have been $300 maintenance visits. How to Locate and Use Your Sewer Cleanout knowledge isn’t just for emergencies—it’s the key to protecting one of your home’s most critical systems. A small investment in prevention today saves both money and the nightmare of sewage backups tomorrow.
Frequently Asked Questions about Sewer Cleanouts
What if my home doesn’t have a cleanout?
If you live in a charming pre-1940s home, you might find it lacks a dedicated cleanout pipe. Don’t worry – you’re not alone! Many historic homes were built before cleanouts became standard in building codes.
Without a proper cleanout, plumbers typically need to get creative with access points. They might need to work through a roof vent (not ideal) or temporarily remove a toilet (messy and time-consuming). Neither option is particularly convenient or cost-effective in the long run.
Adding a cleanout is one of the smartest investments you can make for an older home. While installation typically costs between $500 and $2,000 depending on your specific situation, the peace of mind is priceless. Just imagine having that easy access point when you’re dealing with a holiday weekend backup!
Our technicians throughout Murrieta, Temecula, and Orange County have installed countless cleanouts in historic homes. The owners consistently tell us how much easier maintenance has become – and how grateful they are during those inevitable emergency situations.
Can I install a cleanout myself?
While those DIY videos might make it look straightforward, installing your own cleanout is one project that’s generally best left to the professionals. Here’s why:
Most cities and counties require permits for any sewer line modifications – and for good reason. This work involves cutting into your main sewer line, which requires specialized tools and expertise that most homeowners simply don’t have. The stakes are high: improper installation can lead to leaks, backups, or code violations that might come back to haunt you when selling your home.
If you’re still determined to DIY (we understand the satisfaction of completing your own projects!), at minimum research your local code requirements, obtain proper permits, use appropriate materials specifically rated for sewer use, and ensure proper slope and connections. Errors can be costly and messy.
At SewerRepairs.com, we specialize in minimally invasive cleanout installations throughout Riverside and surrounding areas. Our trenchless methods often mean we can add a cleanout with minimal disruption to your landscaping and daily life.
How often should professionals clean the main line?
Large families naturally put more strain on plumbing systems, potentially requiring more frequent maintenance. Homes with towering oak trees or willows near the sewer line often benefit from annual cleaning to prevent those aggressive roots from causing blockages. And if your home features those charming but aging cast iron pipes, more frequent attention helps extend their lifespan.
Previous blockage issues are also a clear sign you might need a more aggressive maintenance schedule. Why wait for another backup when preventative care is so much more affordable?
A thorough professional cleaning typically includes a camera inspection to identify potential problems, hydro-jetting to clear the entire line, and a post-cleaning inspection to verify everything is flowing smoothly. This comprehensive approach not only addresses current issues but helps prevent future problems.
Throughout our years serving the Inland Empire region, we’ve found that combining regular cleaning with camera inspections provides the most comprehensive approach to sewer maintenance. Think of it as preventative healthcare for your home – a small investment now prevents major headaches later.
Call SewerRepairs.com Today!
Maintaining your sewer system is much like changing the oil in your car—it’s not exciting, but it prevents catastrophic failures. Setting a regular 18-22 month cleaning schedule with a professional is one of the smartest investments you can make in your home’s infrastructure. Keep records of these services so you can track patterns and anticipate potential issues before they become emergencies.
Here at SewerRepairs.com, our team has spent decades solving sewer problems throughout Riverside, Corona, Redlands, Moreno Valley, Murrieta, Temecula, Orange County, and the entire Inland Empire. We’ve developed specialized knowledge of local soil conditions, tree species, and plumbing codes that affect how your sewer system performs. Our trenchless technologies often save homeowners thousands compared to traditional excavation methods.
Your home’s sewer system works silently in the background until there’s trouble. When problems arise (and eventually, they do in every home), knowing exactly where your cleanout is located and having it properly maintained can mean the difference between a quick fix and a homeowner’s nightmare.
For expert help locating a hidden cleanout, installing a new one, or addressing any sewer concerns, our team at SewerRepairs.com is just a call away. Our specialized knowledge of local plumbing systems throughout Riverside County and San Bernardino County ensures you’ll receive the most appropriate solution for your specific situation.
Learn more about our expert sewer repairs and how our trenchless technologies can save you time and money while extending the life of your sewer system.